someone, 8-years old, likes Spongebob Square Pants a lot. And I wanted to knit him a pullover. And there was the idea...
I talked about my plan to make a Spongebob pullover in the forum of knittinghelp.com, so I want to let you take part in my attempt.
my basic models are these 2:

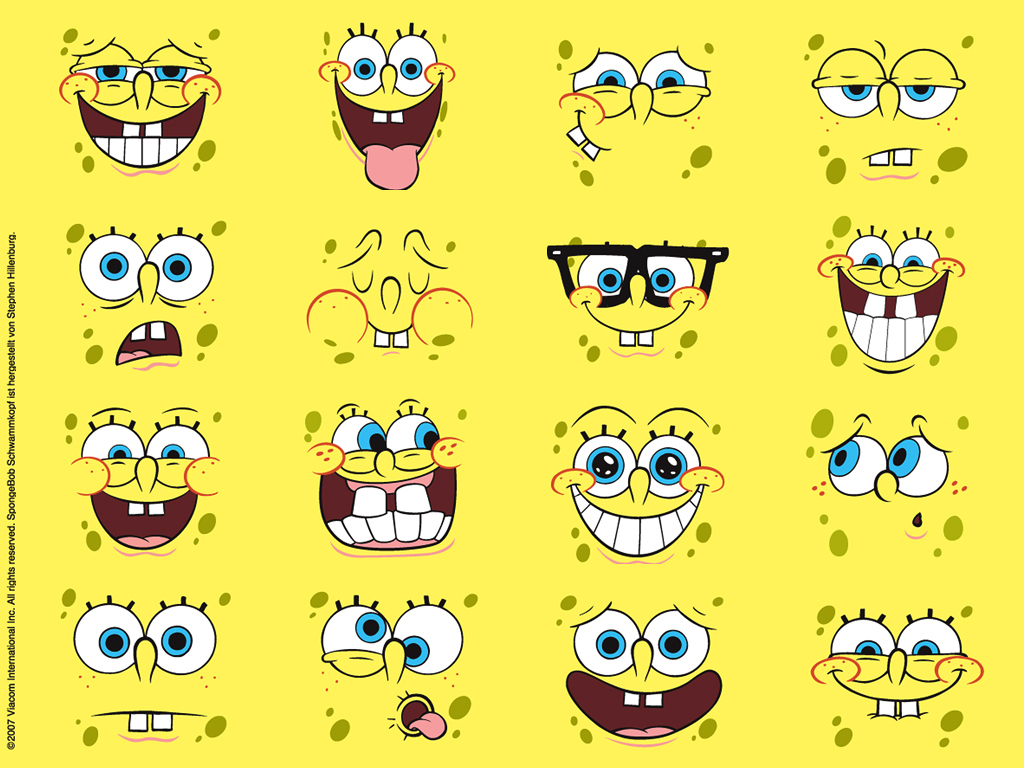
one side smiles, one side grumps  (I use the top right face for the backside and the bottom right face for the front side)
idea:
I want to make a sleeveless pullover that basically is the shape and appearance of Spongebob. It is for my godson who is 8 years-old now. He LOVES the idea.
project:
so, there was my task. I did not find a propper sample of a NICE boys pullover without sleeves that served the purpose. It is supposed to be straight but not endlessly bulky and so on. So I just made my own pattern. We will see how it works.
My idea is to make a pullover that has 2 front sides (both sides being the same) and 2 different facial expressions on it, so it can be worn either side around. (everything the same, except the face itself).
yarn:
Saturday I bought the yarn. I did not get to chose the yarn I was intending because it wasn't there in the color range I needed, so I went for 2 yarns by Lana Grossa that had the same meters (160m) per 50 g and look similar.
I needed yellow, off-yellow-to greenish, white, brown, black and red (for the tie and some pieces)
I swatched and came out with 20 stitches and 27 rows on 10 by 10 cm on a needle size 4.5mm.
size:
I decided to make the pullover 42 cm wide (approx a size 134 in German sizes and thereby a little big just now to grow into) and 46 cm high. It will be a little longer at first but he can grow within it. If I make all that efford, I want it to fit longer than just a few month. Kids that age grow taller faster than wider and he always is a skinny one anyways. So there will be some time in that piece.
shape:
I will do arm holes with some cast off alonge the edge and will make a relatively wide neck opening. I came up with approx. figures for that shaping already by consulting other patterns and books but I will wing it, mostly as I get to it.
knitted features:
the pullover is knitted in stochinette stitch (mostly) and has intarsia as well as stranding patterns in it.
bottom edge:
now, since it is a pullover to grow into, I did not want a cuff on the bottom that sits more or less tight on the hips. I wanted a straight edge.
I used needles size 3.5mm and cast on my 85 stitches (42,5 cm with 20st to the 10cm) with a provisional cast on (crochet on with contrast yarn).
after 15 rows of st st I undid the cast on, then purled the 2 sides of my seam line together stitch by stitch.
therefore I now have a tubular seam on the bottom that makes the pullover hang nice and straight but non-curling and with some weight to keep it straight.
design:
spongebob wears square pants, as we all know.
so the bottom edge is brown, then gets 4 rectangles near the end of the pants section in black (the belt behind the loops). I used stranding technique, twisting the yarns after each stitch so there are no floats.
stranding:
For that I used both yarns on my left hand (continetal knitter as I am) over the index finger, but my contrast color (black) runs over that finger reversed therefore hangs in the front. I then knit "over and under" alternatingly... I used to be really good at this, years ago, but I am rusty and need to practice again. the knits are fine, but the purls with the MC get me hard... I will keep trying)
small sections in black:
..like the corners of the shirt on spongebob: I used 2 yarn ends, 90 cm each, one for each corner of the shirt's collar. I started the first 2 stitches in the middle of that string and used either end for the edges running up to the collar line. like this I needed no stranding of black behind white ( I want to have as little string traveling the back as possible and also think, black behind white might show..)
this I will have to use again for the mouth and maybe around the eyes.
But I do reserve some lines of the desgin to embroidery after the fact. Not everything gets knit.
special feature:
Spongebob wears a tie. I made the tie (seed stitch) in a small piece, then, from the top of the pants, worked it into the knitting itself. So the tie is "part of" the shirt, but over the pants now, flapping. I will need to crochet and embroider some black around it to make the look better. By now the shape is not yet quite right, but then it will be sweet. The "knot part" of the tie is in garter stitch to change structure.
my knitting charts:


Each box in the grid was 5 stitches and 5 rows for me. If you make a pullover approximately the same size, you can stick with that. You can always make the yellow a little wider or smaller. If you make a pretty different size, you can estimate the boxes to be 4 stitches and 4 rows for a smaller pullover or 6 stitches and 6 rows for a bigger pullover and so forth.
The pictures are already stretched out so that the stitch-ratio of knitting stitches being higher than wide is taken into account.
Estimate the positions of all motives. I just eyeballed things as I went and it did work out. Just about getting teeth and eyes centered in the picture and getting the tie centered I recommend exact placement of the middle stitches.
material:
I bought too much yarn, by the way.
For the front side I used one ball of yellow in addition to all the other colors. So I will have to return some yellow to the shop. No big problem, though. They take it back or exchange it for something else as long as it is unused.
I am currently working on the back side of the pullover. The pictures I have up to now are just bad photo quality but they give a first impression of the front side. There still is a lot of the embroidery missing that is giving Spongebob his features. I will keep you posted on my progress.
 |
| front side of side No. 1 |
 |
| back side of side No. 1 |
Addition: I have meanwhile made 2 videos about how to knit while weaving in the yarn on the inside and I want to link them here for further reference:
The Knit Side: http://www.youtube.com/watch?v=M9cE4FMl7R4
The Purl Side: http://www.youtube.com/watch?v=c0i1jgQoJoA
EDIT:
I finally posted the photos of the finished result:
No comments:
Post a Comment